I recently decided to redefine my classroom space as it has become overrun with materials. I wanted to create something that ensured organizational structure while adhering to the demands of my classroom. For those of you who don’t know me I work with a lot of educational technology tools and it wouldn’t take much for some of those to go missing or get put away in the wrong location. In order to rectify this issue I elected to create customized labels which would reduce the probability of that happening. There are multiple benefits of this which I will enter below. I have attached the necessary visuals to help you create your own labels easily and best of all for free!
Tools: I elected to use Google Drawing due to simplicity and customization ability. This is very easy to do for anyone looking to change their classroom look/feel/etc.
Applications:
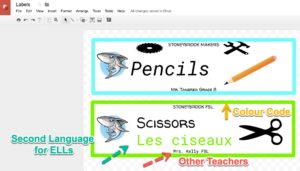
- Colour Code: This allows you sort materials by category or subject. For TLs this could mean having circuit materials one colour and robots another. A second option is to create dynamic centres where students are placed in coloured groups and return items based on the coloured label. This alleviates stress on the students as well as the teachers.
- Pictures for ELLs: The use of pictures can be useful to ELL students who are still not familiar with the given language structure. The picture allows them to identify the objects which ensures they are active class participants. It reduces the chance for students feeling overwhelmed and developing lower emotional-social intelligence (ESI). You can go as far as to add additional languages to the labels which creates a truly unique and inclusive classroom culture.
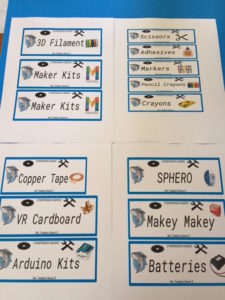
- Rotary Storage: Unique labelling allows teachers within a rotary role to customize storage solutions easily and effectively. They are able to have their own materials which prevents items from “disappearing”. They can save adequate prep time by having the appropriate storage boxes ready based on class/subject.
Examples: You can create your own label unique to your school and alter aesthetics
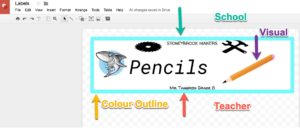
Makerspace Label
STEPS:
- Open Google Drawing & Insert a “Textbox”
- Fill the textbook with a given colour
- Insert images ***TIP** I found adding transparent images much easier to work with.
- Insert a second textbox within the bigger textbox for what you want the label to say “Pencils”
- Change the line thickness and colour
Google Drawing Benefits
Labels
I hope this helps you and please share your creations with me!
Below is a video tutorial for those who want to see the entire process.
Thank you
Derek Tangredi