French Code micro:bit
One of the desirable elements of the micro:bit is that it is a dynamic digital wearable technology which can be utilized within every subject discipline. While there is a plethora of micro:bit resources available (Kitronik, micro:bit.org, Fair Chance Learning, & more) often times French is neglected. The purpose of this post is to create a few dynamic activities which can be used in both a French & English classroom. They have been designed to create authentic speaking opportunities while at the same time integrating technology and computational thinking skills.
These activities while fun and engaging are also easy enough to complete while teaching several programming concepts. The best part is that the primary activity can be altered easily to fit the needs of any classroom.
Activity: vrai ou faux (true or false)
How it Works: As mentioned you can alter this is several ways to suit the needs of your classroom but the aim of this activity is to have students move throughout the classroom asking their peers true or false (vrai ou faux) questions. You can incorporate music or other elements but students are to ask their a peers a given question which will result in one of two answers. If the question results in a “true” (vrai) response the individual being asked will press “A” on their micro:bit. If the question is “false” the student will press “B”. In order to complete this activity you will need to have the students make wristbands which can be made out of duct tape, or simply paper and tape. Then have them use tape to affix the micro:bit onto the bracelet. See image below for examples.

Wristband
Sample:
Student A: Your name is Tim (correct)
Student B: Presses “A” on their micro:bit.
*Students alternate roles and then move on to find another partner. They will do this until they reach an expected number at which time the micro:bit will inform them they are finished.
You could alter the game format if you see fit. Some ideas:
- Marco Polo
- Truth or Dare
- Rock, Paper, Scissor
There are far more options but you control the way in which the game is played.
Let’s Begin:
To code please go to Microsoft MakeCode.
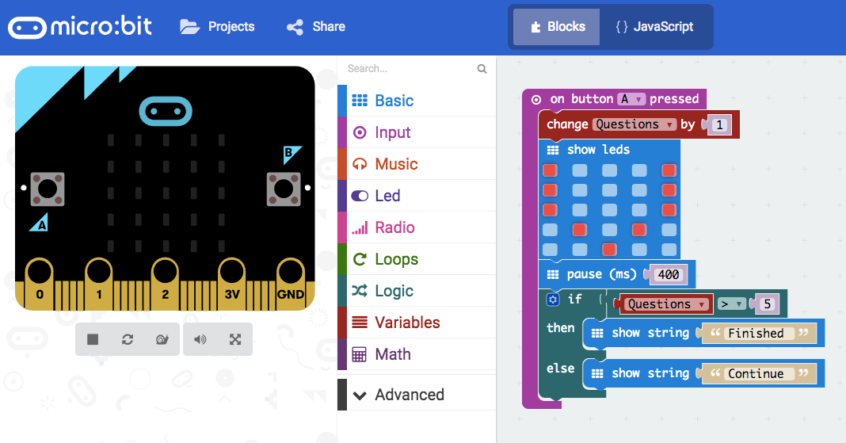
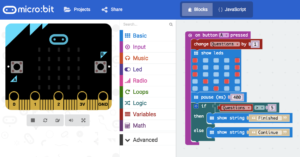
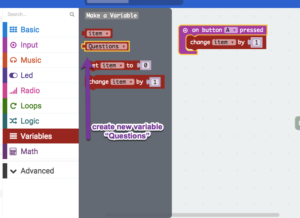
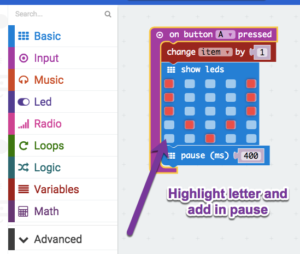
To being you’re going to select the”input” and drag over the “on button A pressed” block. You will then require the red blocks (variables). Select and drag “change item by 1”. Finally create a new variable by selecting “make variable”. Entitle this whatever you like but I elected to call it “Questions”.
Step 1
After having completed the variable, use the drop down “item” and change it to “Questions”.
Next, we are going to select the “Basic” blocks and drag over “show leds”. You will now need to click on each box you wish an led to illuminate. In this case, I highlighted the boxes to create a “V” (vrai). This way every time a student presses “A” a “V” will appear on the micro:bit. Lastly, include a “pause” block and change the time to your preference.
Step 2
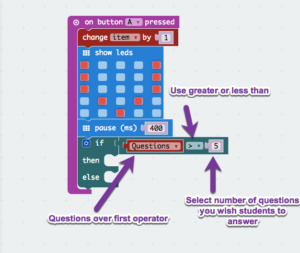
Now you will use the “Logic” blocks to and incorporate the “if then else” block. You will also need to add your “greater than” block. Finally return to “variables” and select “Questions” and drag it over top of the first operator. You can use the drop down menu to select greater than or less than. Select the minimum number of questions you want students to ask in the far box.
Step 3
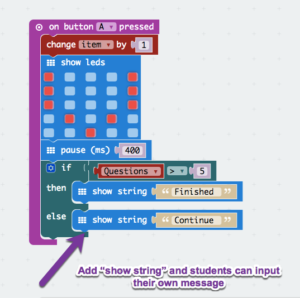
The final step is to have students add two “show string” blocks. If you follow the template then your first message should notify the students that they have completed the challenge (Finished). The second message should inform them that they are to keep going (Continue).
Step 4
Students would now repeat this code but with “on button B pressed”. Everything else in the sequence is the same.
Just in case the visuals are too difficult to follow we have taken the liberty of completing the code sequence on video. Please view below.
As always if you have any questions please feel free to contact me: @dtangred